Recent Posts

Pages: 1 ... 5 6 [7] 8 9
61
Here is the code:

Code: [Select]
void setup() {
Serial.begin(9600);

// -- LEDs and IRBS Initialization -- //

pinMode(BigGreenLED, OUTPUT);
pinMode(YellowLED, OUTPUT);
pinMode(IRBS_LED, OUTPUT);
pinMode(A0, INPUT);
pinMode(AD_Ready, INPUT);

// -- DIP Switch Shift Register Initialization -- //

pinMode(ploadPin, OUTPUT);
pinMode(clockEnablePin, OUTPUT);
pinMode(clockPin, OUTPUT);
pinMode(dataPin, INPUT);

digitalWrite(clockPin, LOW);
digitalWrite(ploadPin, HIGH);

DIPs = read_dip_switches();
display_dip_switches();
DIPSwitchValues = DIPs;

// -- AD7705 Initialization -- //

ad7706.reset();
ad7706.init(AD770X::CHN_AIN1, AD770X::CLK_DIV_1, AD770X::BIPOLAR,
AD770X::GAIN_1, AD770X::UPDATE_RATE_500);
        // Not using the second channel:
//ad7706.init(AD770X::CHN_AIN2, AD770X::CLK_DIV_1, AD770X::BIPOLAR,
// AD770X::GAIN_1, AD770X::UPDATE_RATE_500);

lcd.init();
lcd.backlight();
lcd.print("bbs.venturii.net");
}

void loop() {

static uint8_t x = 0;
static unsigned long as = 0, bs = 0, il_sum = 0;
unsigned int t = 0;

// Set Green LED to the value of the Data Ready pin from the AD7705:

digitalWrite(BigGreenLED, digitalRead(AD_Ready));
as += ad7706.readRawResult(AD770X::CHN_AIN1);

// IRBS - Take sample with LED On:

digitalWrite(IRBS_LED, HIGH);
digitalWrite(YellowLED, HIGH);
il_sum += 1023 - analogRead(A0);

// IRBS - Take sample with LED Off:

digitalWrite(IRBS_LED, LOW);
digitalWrite(YellowLED, LOW);
bs += 1023 - analogRead(A0);

x++;

// Oversample:
if (x > 14) {

// Display rad value from AD7705:
t = as / x;
lcd.setCursor(0, 1);
lcd.print(t);
lcd.print("     ");

// Display differential value from IRBS:
t = bs / x;
t = il_sum / x;
lcd.setCursor(7, 1);
if (il_sum > bs) {
lcd.print("[");
lcd.print((il_sum - bs) / x);
lcd.print("]   ");
} else {
lcd.print((bs - il_sum) / x);
lcd.print("   ");
}

// Clear buffers and counter:

as = bs = x = il_sum = 0;
}

// Lather, rinse, repeat. Always repeat.
}
62
The other AD7705 board does the same thing. :( Scratch that off the list.

Another piece of VERY odd behavior I've noticed is that when the AD7705 is locked up, the analog reading of the IR sensor affects the DataReady LED! I have NO idea how that happens, and if I disconnect the DataReady pin from the AD7705 it floats so the LED flickers, making me all but convinced that the signal is coming from the AD board. Every single time though, it does the same thing. It runs for a few seconds (30-90 it seems) and then the green LED goes out. Now if I place an object in front of the IR sensor and the value rises above 100 (seems to be exactly 100 that is the tripping point) (100 out of 1023, I might add.) - the green LED goes on. Dropping the value of the IR sensor below 100 extinguishes the LED, but all the while the AD7705 reports a value of 512. It is shifted two bits to the right, so I imagine this is probably 16385. Maybe I'll drop the bit shift off and see what the actual number is *just for something to try.* This is really bizarre. I can't wait until I'm reading this in retrospect with a smile on my face and thinking to myself, "If only I knew then what I knew now..."
63
Background / Preamble:

I'm working on a prototype PCB involving an AD7705 Analog to Digital converter, which I have been wrestling with over the past couple of hours. For my testing purposes, I've soldered together a little prototype PCB using socketed components and quite a few wires, housing the basic components. Some of the pieces, including the AD7705 are on external PCB's, as they come from Aliexpress that way. I've put together 6x header blocks on my PCB to connect to the various off-board modules in a star configuration using standard 4-pin connectors on each. This makes for some clean connections, and a fairly presentable package all things considered, as I will need to mount this thing in my house once I finish the hardware and software in the garage and begin collecting data and tuning all the working parameters before digesting all things learned and producing a PCB that has all these things onboard itself.

The prototype as it is uses an Arduino Pro Mini (one of the knockoffs I'm sure) and has a 2x16 LCD display on the I2C bus, the AD7705 on the SPI bus, a couple of LEDs for realtime feedback, and a TTL-to-USB adapter for updates and Serial Port monitoring. I have an Infrared sensor monitoring ambient IR levels using the Atmel 328's onboard ADC, and I'm feeding the whole assembly power off a regulated power supply with onboard digital voltage readout, dialed in at 5.1Vdc. When it starts up, the LCD initializes and displays the values from the AD7705 and the IR sensor (basically values from both ADC's oversampled 15x.) ... and nothing else.

Present Problem:

It works for several seconds to several minutes, and then the AD7705 reports a value of 512 and stops updating. I connected a wire to the Data Ready pin on the AD7705 board and mirror that pin on one of the status LED's. When things are working, that LED flashes rapidly. When it stops, the LED is extinguished, which means that the Data Ready pin is low. If I hit Reset on the MCU, it starts up and everything works again, but inevitably the AD7705 stops working after a number of seconds. During this time, the readouts from the onboard ADC continue on the display, so the MCU itself is not hung, I just do not know what is going on with the AD7705.

This is probably one of the many instances where an oscilloscope would be very useful, but I am left with print() and digitalWrite() statements in the meantime. Actually, one other thing I can test is that I have another AD7705 board, I will swap them and see if the other one does the same thing. I noticed that the Analog Voltage Reference IC on this one looks like it wasn't sitting properly when it got soldered and I think there are gaps between the pads and a few of the pins on it. Begin troubleshooting...

It's funny, these projects always get snagged in the wrong places. For example, I expected trouble getting it working with a different Chip Select pin, but once that was resolved and I started getting data from it, I thought I was out of the woods. Then I encountered seemingly high amounts of noise, so knocked a few bits of the ADC off (it is a 16-bit converter so fairly high precision, most of which is probably not necessary for my application.) Got the readings pretty stable and thought I was out of the woods again, ready to write [proper] firmware to begin interfacing this with the Venturii VDAC module - only to discover that the external ADC seems unstable. I don't want to move on from here until I have a proven platform I can fall back on in case the Venturii firmware is buggy, but now I am left troubleshooting something else I had not anticipated. So it goes...
64
Sensors / AD7705 16-Bit Analog to Digital (ADC) Converter
« Last post by Cube on October 10, 2015, 12:12:20 PM »
I've been scratching my head on this one for quite some time, and maybe someone can shed some light on this. I have an AD7705 16-Bit BiPolar Dual Channel Analog to Digital converter, which I am trying to incorporate into a prototype that I am building as part of my water meter project. Initial prototype on breadboard worked wonderfully, and there are posts about it on www.venturii.net. I've been building a perf board version, to make the circuitry a little more firm and to incorporate numerous other circuits and supporting gear as a firmware-proving platform. Out of curiosity, rather than any sort of necessity, I moved the chip select pin off of pin 10 and onto pin 4. In the AD7705 library there are static declarations for MISO, MOSI, CLK and Chip Select pins, and I changed the Chip Select pin designation from 10 to 4. No go. No matter what I tried, it would not work in this configuration, but if I choose pin 10 (and adjust wiring accordingly) it works perfectly. I've read posts on the Arduino forum and others where people have insisted that they've been able to get this to work, some claiming that you have to set the pin as an output before calling the SPI functions, which this library does, yet no matter what I've tried, it does not work on anything but pin 10.

As I said, this is fine on this project, I can use pin 10, I am just wondering if there is some way to use other pins for chip select (and have it actually work) as I've never been able to accomplish this seemingly simple and documented possible task.
65
General Discussion / Re: Your www.venturii.net - cool potal
« Last post by Cube on October 05, 2015, 02:53:20 PM »
Thank-you. Do you have an interest or background in automation or integration? How did you find the Venturii blog and this forum?

- John
66
General Discussion / Your www.venturii.net - cool potal
« Last post by zaidEa on October 05, 2015, 03:16:42 AM »
Aujourd'hui je lisais beaucoup sur cette question.
zaidEa
67
VDAC-NIM-1 / Pre-Prototype Prototype Built
« Last post by Cube on October 02, 2015, 10:35:11 PM »
So before I put through a $400 PCB order, I wanted to "pre-test" a few of the circuit designs that I put into the NIM-1. It's simple things, but I want to make sure that everything will work "the way I think it will" before making such a commitment and investment. This also forces advancement of the VDAC firmware, which will form the heart of the NIM-1. I am also pretty excited to "announce" that I may have found a way to incorporate OWI code into VDAC in such a way that the other OBD types will not get starved for attention and potentially miss important updates.

The first update to the VDAC firmware will actually be a pretty major one; implementation of what I've been calling the "Multi-Drop Firmware" to allow the creation and deployment of [smaller|purpose-built|multiple] VDAC boards together on the same 4-wire bus (GND, +12VDC, RS485A, RS485B). I wrestled back and forth with the idea of making every single device Ethernet / WiFi enabled, and that is still an option where the application warrants it, but there are certainly places throughout my house where it makes far more sense to simply run a 4-wire bus between multiple modules all tied back to a single NIM or even directly into a USB port or 485-Ethernet/WiFi adapter.

I've ordered quite a few parts from China today to begin testing specific circuits that form the NIM-1. My goal is to prove each circuit before the PCB run as it is quite expense and I've already caught a number of glitches / mistakes / omissions / problems through this process. It may even inspire me to add support for a number of other devices via pin headers for future expansion or user options. One such idea is the incorporation of a display port, for something like a 2x16 or 4x20 LCD display, or maybe even something simpler like one of those TM1638-based LED/Button interfaces; the possibilities are endless. I love this stuff!
68
General Discussion / Minigroup Shutting Down
« Last post by Cube on October 02, 2015, 10:04:27 AM »
I received an email from Minigroup yesterday announcing that they will be shutting their service down at the end of October. We had been using Minigroup for Venturii discussions, among other things, over the past couple of years and it was a decent service. There were a few things that it lacked, (Two come to mind off the top of my head: 1. Their message editor did not have the ability to preview messages before you posted them, and 2. Only the first message in a conversation thread would display images - all comments below it did not and I don't think there was a way to [force] it to either.)

I'd like to grow this forum into a bustling place to discuss automation and integration topics. So please, tell your friends, ask your questions and let's get this automation party started!

John
69
Sensors / Preliminary Test Results For Using a Hall Effect Sensor to "Read" Water Meter
« Last post by Cube on October 01, 2015, 05:37:09 PM »
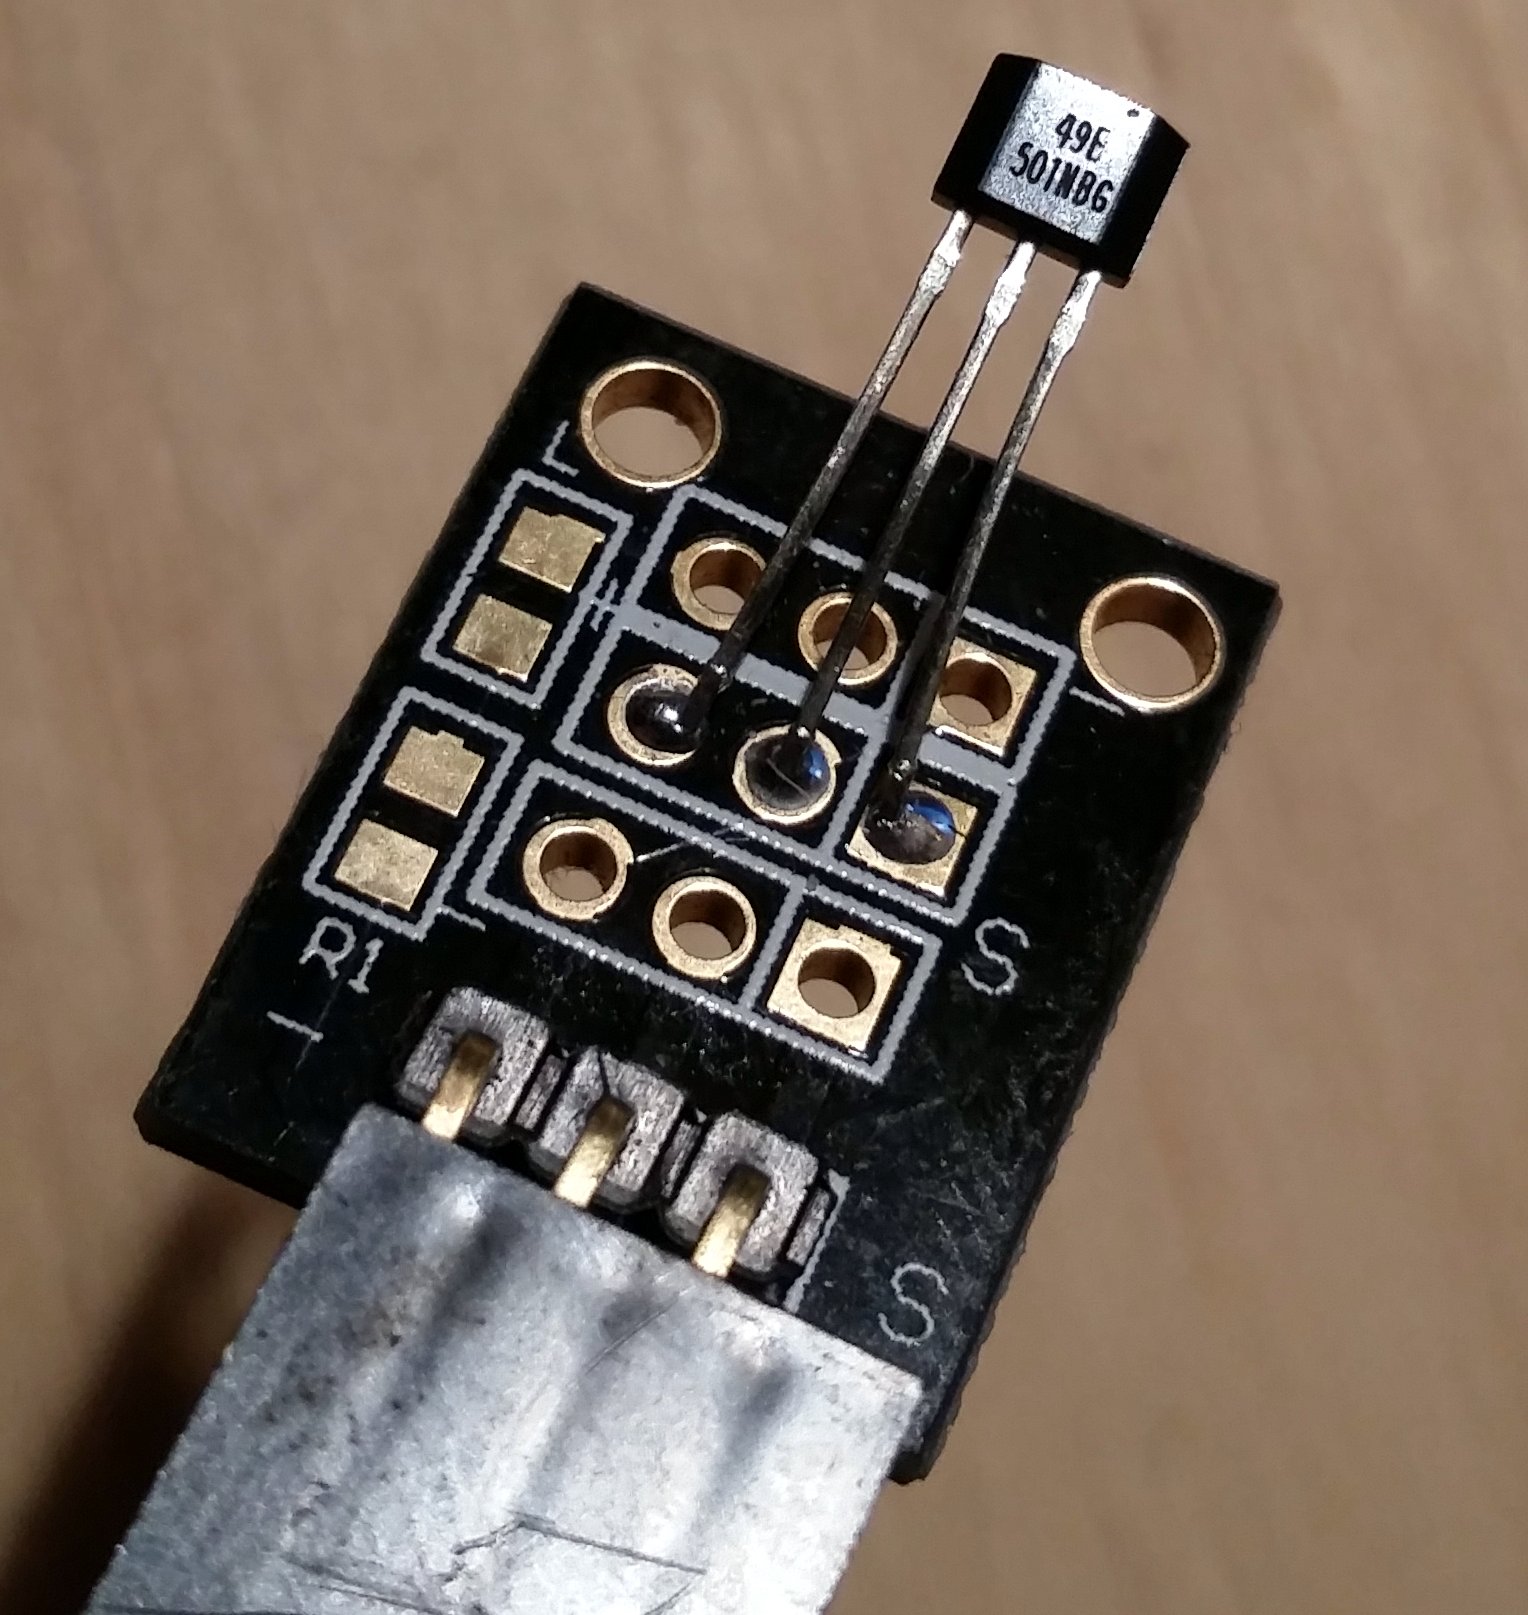
Last night I confirmed a very exciting theory. Using a simple SS49E Hall Effect Sensor taped to the body of my Badger Water Meter, I was able to capture VERY detailed flow data as the magnets within the body of the water meter rotated proportionally to the amount of water flowing through it. For example, here is what I read from the sensor when using a very small amount of water:


And here is what I read from the SS49E sensor while using a fairly moderate amount of water:


The sensor itself came to me as part of an assorted sensor kit purchased from AliExpress:


Data was captured using an AD7705 16-Bit BiPolar Analog-To-Digital (ADC) Converter with a 500Hz sample rate. I will have to incorporate support for this ADC board into the VDAC Firmware as I have a few other planned uses for it on other projects. It certainly performed VERY nicely in this little experiment, and I am very excited to begin using it for other data capture application in the near future.

A much more detailed writeup on this experiment, including some of the history behind it, can be read on the Venturii Adventure Blog at http://www.venturii.net/blog/2015/10/01/measuring-water-magnetically/

- John
70
Energy Management & Monitoring / Re: Sun XTender PVX-340T Battery in a Solar Application
« Last post by Cube on September 26, 2015, 06:33:12 PM »
The Sun XTender battery is definitely toast, I hooked up a standard 12v 7 AmpHour battery in it's place and I get about 3 and a half hours of run time, far out-lasting the PVX-340T which is down to running for about 1 hour / night. I tied in a transfer switch this morning to select which battery supplies power to the outside lights, and tonight I'm going to see how long the Optima Red I have in the second battery slot runs this 2 amp load for. Unfortunately I couldn't find the correct resistors to build another voltage divider for measuring the voltage of the second battery... I guess I'll have to resort to current for the time being.

The other day I pulled in a new 10 AWG conductor to the back deck controller. Originally I was going to run all the outside lights on a single circuit, but then it occurred to me that if I need to supplement the batteries with AC power supplies, I might need a heck of a power supply to provide for all the load. By splitting up power supplying both controllers, I can power them together off the battery if need be, but separately off [smaller] AC power supplies without having to go to a monster. Yes, there may be efficiency in doing so, but there is also cost if I have to buy a power supply I don't already have. ;)
Pages: 1 ... 5 6 [7] 8 9